i edited an AMI Aptio 4 IV Bios.
First of all - Features:
- CPU Microcode Update
- LAN Rom Module Update
- PowerManagement | Sandy Bridge with ME 8.xx, Ivy Bridge
- Engineering Menu
- UEFI Boot Options
- UEFI Shell
Start
Download the BIOS from the following Website:
Dell Homepage
Direct Link
execute the following command to extract the BIOS rom file:
3350A10.exe /writeromfile
CPU Microcode Update
LAN Rom Module Update
Download UBU Tools from here.
Copy the BIOS Binary into the UBU Folder and execute UBU.bat file.
The Tool will disassemble/analyze the BIOS and shows you what modules can be updated.
In my case i updated the Microcode of the CPU and the LAN Rom Module.
To update the LAN Rom Module press 3 and then 1.
* Update OROM Realtek LAN PXE Device ID 8168 ...Ok!
OROM Realtek Boot Agent GE - 2.64
Press any key to continue . . .
To update the CPU Microcode press 7 and then 1.
Select Microcode for CPU IvyBridge (LGA1155)
Select the newest Microcode
Select Microcode for CPU SandyBridge (LGA1155)
Select the newest Microcode again
Generate FFS files Microcode
Found 1 module(s).
Update Microcode Patch...Ok!
+-----------------------------------------------------------+
|No| CPUID | Platform | Version | Date | Size Hex |
+--+----------+----------+----------+------------+----------+
|01| 000306A9 | 12 | 0000001C | 26-02-2015 | 00003000 |
|02| 000206A7 | 12 | 00000029 | 12-06-2013 | 00002800 |
+-----------------------------------------------------------+
MPDT None
Attention!!!
Check the address in the _FIT_
Address mCode + Size mCode = Address next mCode
Press any key to continue . . .
PowerManagement | Sandy Bridge with ME 8.xx, Ivy Bridge
Next, we will enable the Powermanagement on this Notebook.
Download UEFIPatch.
Execute the following command:
UEFIPatch.exe bios.bin
patch: replaced 10 bytes at offset 273Ah 75080FBAE80F89442430 -> EB080FBAE80F89442430
Image patched
UEFI Boot Options
UEFI Shell
Download another BIOS rom file from the Dell Inspirion N5110 Mod on Insanelymac:
Thread
Direct Link
Start MMTool from the UBU Directory.
You will find here a guide howto work with MMTool (insert, extract, delete modules...).
Extract the following modules from the Dell Inspirion N5110 BIOS Mod file:
- EnhancedFat
- ExtFs
- HfsPlus
- NTFS
- PartionDXE
- HermitShellX64
- EnhancedFat
- ExtFs
- HfsPlus
- NTFS
- PartionDXE
- HermitShellX64
ePSA (Dell Enhanced Pre-boot System Diagnostics)
Extract the following module from the Dell Inspirion N5110 BIOS Mod file:- 0A602C5B-05A0-40C4-9181-EDCD891D0011
This will update 4210.3 to 4213.5.
Do you know a newer version? Share it with me :).
Engineering Menu
Extract the setup module !uncompressed! from the Dell Vostro 3350.
Open the setup module with a hex editor.
Search for the following hex code:
010100010101000000000000Replace it with that hex code:
010101010101010101010101
CRC Fix - Workaround
Problem: I don't know how the crc checksum inside the module will be calculated.There will be following error messages will be shown:
However, i found a workaround.
First delete the original setup module with MMTool inside the original 3350a10.rom file,
after that insert the edited uncompressed setup module. (there is enough space in section 01).
Extract the edited uncompressed setup module again.
This will fix the crc checksum at the beginning of the file.
You can compare the file with a hex editor.
before: D7079489FE99D8439A2179EC328CAC214E9A
after : D7079489FE99D8439A2179EC328CAC214E93
Open the rom file which u are modding.
Press the Insert Button on MMTool,
choose the uncompressed edited crc-fixed setup module and insert it in compressed form.
Flash It!
That's it, you can flash the BIOS now.You will find here a guide to flash it.
I personally prefer to flash it over DOS.
The Tool RUFUS can help you to create a bootable usb stick.
I create a Bootstick with FreeDOS and put the following files on it: afudos.exe , 3350a10mod.bin
afudos 3350a10mod.bin /P /B /K
Optional:
Install Windows 10 in UEFI Mode on a empty HDD/SDD
Make a USB Stick to boot Windows 10 -> Download it from here.Use the windows 7 usb dvd download tool for that.
Press F12 to show the UEFI Boot Options and select the UEFI Entry for the USB Stick.
Follow the install wizard.
To control if the Windows 10 Installation on UEFI Boot Mode was successful you can start a command line as administrator (right click).
Type following commands:
- diskpart
- list disk
If a star appears in the GPT row, everything is fine.
Intel Management Engine Firmware
You can additionaly update the Intel Management Engine Firmware.as far as I know you can't integrate it inside the BIOS.
Todo:
- VBIOS Update
- AMIBCP compatibility
- Enable additional menu points in the BIOS.
- - e.g. Fast Boot
Update Dell Enhanced Pre-boot System Diagnostics (ePSA)- ACPI Fix/Clover|Powermanagement Fix
Progress: Enable additional menu points in the BIOS
First of all, download the Tool IFR Extractor:https://www.bios-mods.com/software-releases-and-updates/2014/01/universal-ifr-extractor/
Choose the Setup Module from the BIOS.
Save the Text-File for analyze.
I switched the following bits in Hexeditor:
0A 82 46 02 <- true to 0A 82 47 02 <- false 1E 82 46 02 <- true to 0A 82 47 02 <- false However, only checkboxes for disable/enable stuff will be shown in the UEFI if i flash it again. Looks like the labels are missing? I don't know. Need some tipps :).
Progress: AMIBCP compatibility
Florin9doi also edited some other modules:
- CORE_DXE
- ReFlash
- AMITSE
- CSMCORE
- SETUP
I wrote with him a PM and he means, that i must cut some too long strings.
Progress: VBIOS
Had some problems with a script.Can anybody tell me something about this error?
Progess: Clover / ACPI|DSDT Fix / Powermanagement Issues
Clover
My goal was to start Clover on this Notebook to override the ACPI on boot process.I would like to use Clover for ACPI debugging purposes -> replace everytime the ACPI table of my UEFI binary and flash it again could be really annoying.
For that, i created a USB Stick with BootDiskUltility.
However, it was not possible to add any boot options | boot files from the Boot Maintanance Manager.
This happend, because following modules were missing:
- EnhancedFat
- ExtFs
- HfsPlus
- NTFS
- PartionDXE
- HermitShellX64
However, no success - the Boot Maintanance Manager is booting, but i still can't load boot files from the EFI partition from the USB stick.
But wait, it shows me the UEFI partition from my Windows installation.
I booted Windows, started the commandline as administrator (right click) and mounted the partition with the following command:
volmount z: /sAfter that i copied the efi/boot/bootx64.efi file from usb stick to the HDD/SDD:
xcopy d:/efi/boot/bootx64.efi z:/bootx64.efiStart the Boot Maintanance Manager from USB stick and select the bootx64.efi file from HDD/SDD.
Works for me.
ACPI|DSDT Fix / Powermanagement Issues
I requested a fixed ACPI from arthur-pt on olarila.com.
Compiled it inside my Linux Kernel for testing purposes, but it will freeze my notebook :/.
https://wiki.archlinux.org/index.php/DSDT
Other research results
http://www.tonymacx86.com/threads/vostro-3350-lion-ok-geting-tuning.50221/
http://www.osx86.net/files/file/2154-dsdtaml-for-dell-vostro-3350/
http://www.osx86.net/files/file/2130-extra-for-dell-vostro-3350/
UEFI Revovery
Manual UEFI Recovery
I inserted in the Boot Block Section (Section 02) a module.However, i think there is a checksum or something for the hole section that was invalid now.
I flashed the UEFI and the device didn't start anymore.
Got only a black screen and a repeating beep code (1-1-1-1-1-1-1...).
In the boot block section is the emergency recovery module.
so this is the point, where you can only flash the sop-8 chip manually.
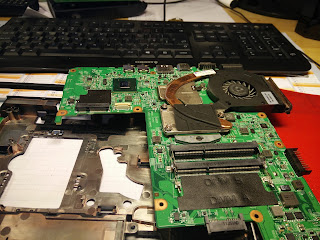
First of all, you must remove the mainboard from your notebook.
Take a look at this guide for this procedure.
Remove the CMOS battery for safety purposes.
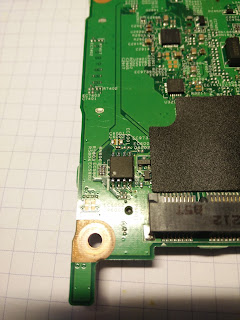
The flash chip is in the near of the wifi card port.


google for the chip designation and search for a specifcation sheet.
I can't describe the flash procedure for your notebook, because i don't know what flash device you are using.
however, you will need the following pins for the flash procedure: VCC, CS#, SO/SPO7, GND, SI, SCK
map it to the ports of your flash device and use the original bios binary for reflash process.
Boots again. :)
Software UEFI Recovery
you can extract the recovery module in the boot block partition (02) of the UEFI module.
open it up with your hex editor, you will find the names for the rom or hdr file there.
first of all, disconnect the cd-rom and harddrive phsyically from your notebook.
warning: the connector for the harddrive is a little bit fragile ->
pull on the right and left foots to open it up.
now pull the ribbon cable out.
if you are unsure, you can use this owner guide from the dell website.
format a usb stick with RUFUS:
Select first the USB stick you want to format.
Warning: All data on this USB stick will be lost.
Use MBR partition scheme for BIOS or UEFI, FAT32 (Default), Cluster Size 8192 bytes (Default).
The volume label doesn't matter.
Set a tick at quick format.
Untick "Create a bootable disk using..."
Untick "Create a extended label and icon files"
Download the UEFI version that was at last on your notebook.
if it was version A07, then download A07.
if it was version A10, then download A10.
Extract from 3350A10.exe / 3350A07.exe the UEFI file.
Open up a cmd and enter the following command: 3350A10.exe /writehdrfile
Rename the rom file to 3350.hdr and move it on the usb stick.
Disconnect the battery from your notebook.
Plug In the pendrive.
Press the end key and hold it down.
Connect the charger (still hold END).
The notebook starts automatically and shows the recovery screen.
Press enter and wait until finish the flashing.
Press any key to restart.
The first restart attempt wouldn't be successful.
The second one would work.
Give it a little bit time between the start attempts.


